Odoo 17 simplifies employee lunch management with its robust Lunch module, designed to streamline lunch orders, vendor coordination, and expense tracking in one central system. From ordering and delivery to managing employee preferences and vendor contracts, this module enhances efficiency and organization for both employees and administrators. Its user-friendly interface ensures seamless lunch operations for workplaces of all sizes.
This article explores the key features and capabilities of the Odoo 17 Lunch Application in detail.
My Lunch Menu
The My Lunch menu includes several options to manage lunch orders and track history. Key features include:
New Order
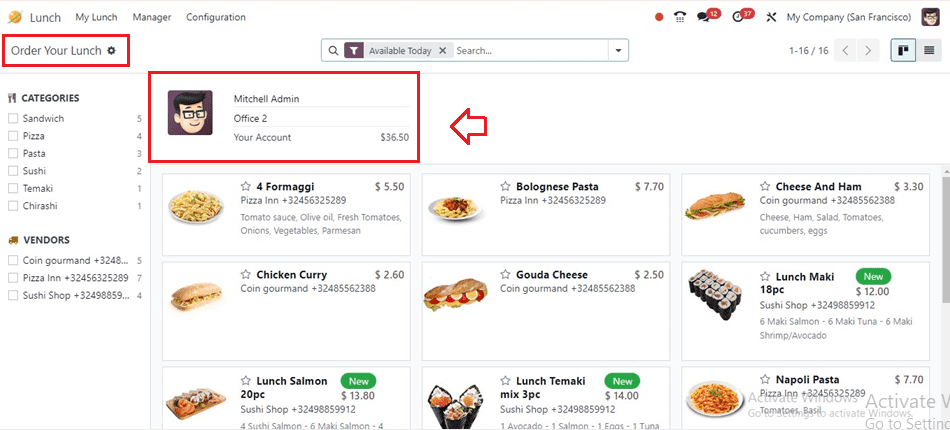
The Order Your Lunch dashboard allows users to place lunch orders directly from the platform. Users can view details such as their work center, name, and account balance, making the ordering process quick and transparent.
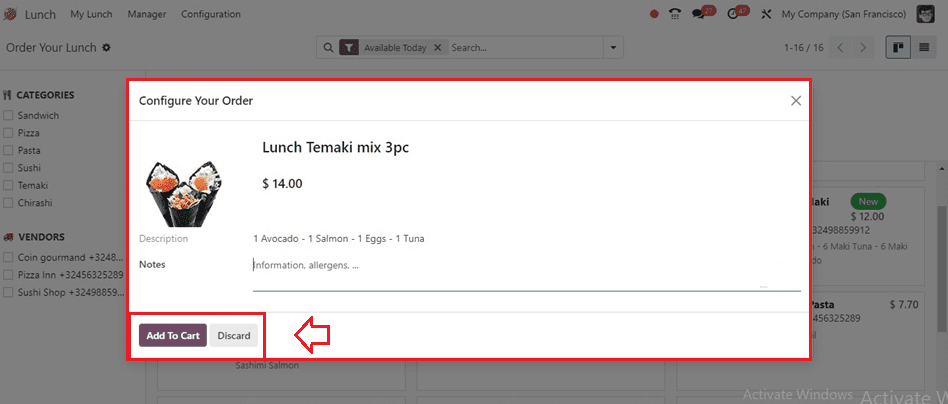
Users can choose food options from categorized menus and specific vendors. Using the drop-down menu, they can easily select the appropriate items and preferences. Upon selection, a confirmation pop-up window appears, allowing users to add extras and provide additional descriptions for their order. Once finalized, the Add to Cart button is used to include the selected food items in the cart, ready for checkout.
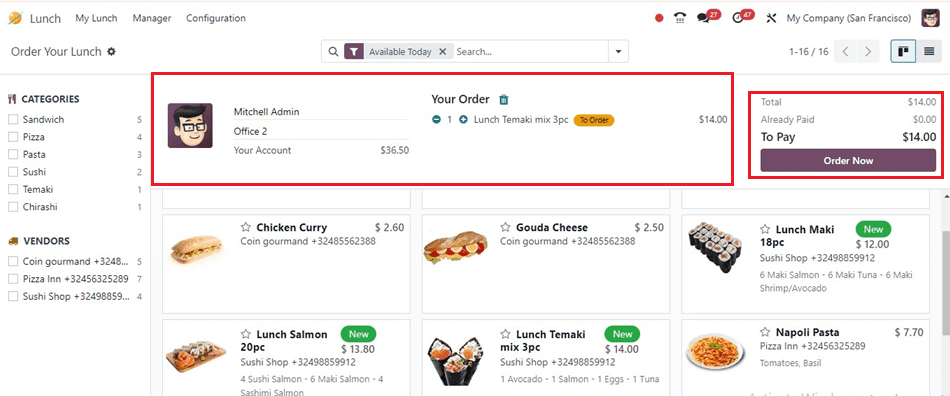
Then, the user can view the quantity being added in the Your Order menu. The total amount is displayed, and the order is placed by selecting the Order Now button.
Once an order is placed, an Ordered label will appear next to it, and the cost of the order will be deducted from the user’s account balance. Administrators can configure a message to be sent to users after order delivery through the Settings menu. This feature allows customization of post-delivery messages, enhancing communication. Additionally, the Lunch module supports WhatsApp integration, enabling users to place orders via the messaging app.
My Order History Menu
The My Orders History dashboard, accessible from the My Lunch menu, provides a detailed overview of past orders. Users can review key information, including:
- Order date
- Vendor
- Product details
- Extras and remarks
- User
- Lunch location
- Price
- Order status
- Associated company
Key Features in the Order History Menu:
- Reorder Button: Quickly place the same order again with a single click.
- Send Notification: Notify the vendor directly about an order.
- Cancel Button: Cancel orders conveniently if needed.
This menu makes managing and revisiting previous lunch orders simple and efficient.

My Account History
The My Account History option, accessible from the My Lunch menu, allows users to track the transaction history of their lunch account or wallet. This feature provides a clear overview of lunch order payments and account activity.
The history displays the following details:
- Order Date: The date when the transaction was made.
- Description: A brief explanation of the transaction, including order specifics.
- Amount: The cost deducted for each order or credited back, if applicable.

Managers Menu
The Managers menu in the Odoo 17 Lunch module provides a dedicated section for managers responsible for overseeing and managing lunch operations within the organization. This menu includes tools to streamline lunch services, track daily orders, and manage vendors effectively.
The menu features the following submenus:
- Today’s Order
- Control Vendors
- Control Accounts
- Cash Moves
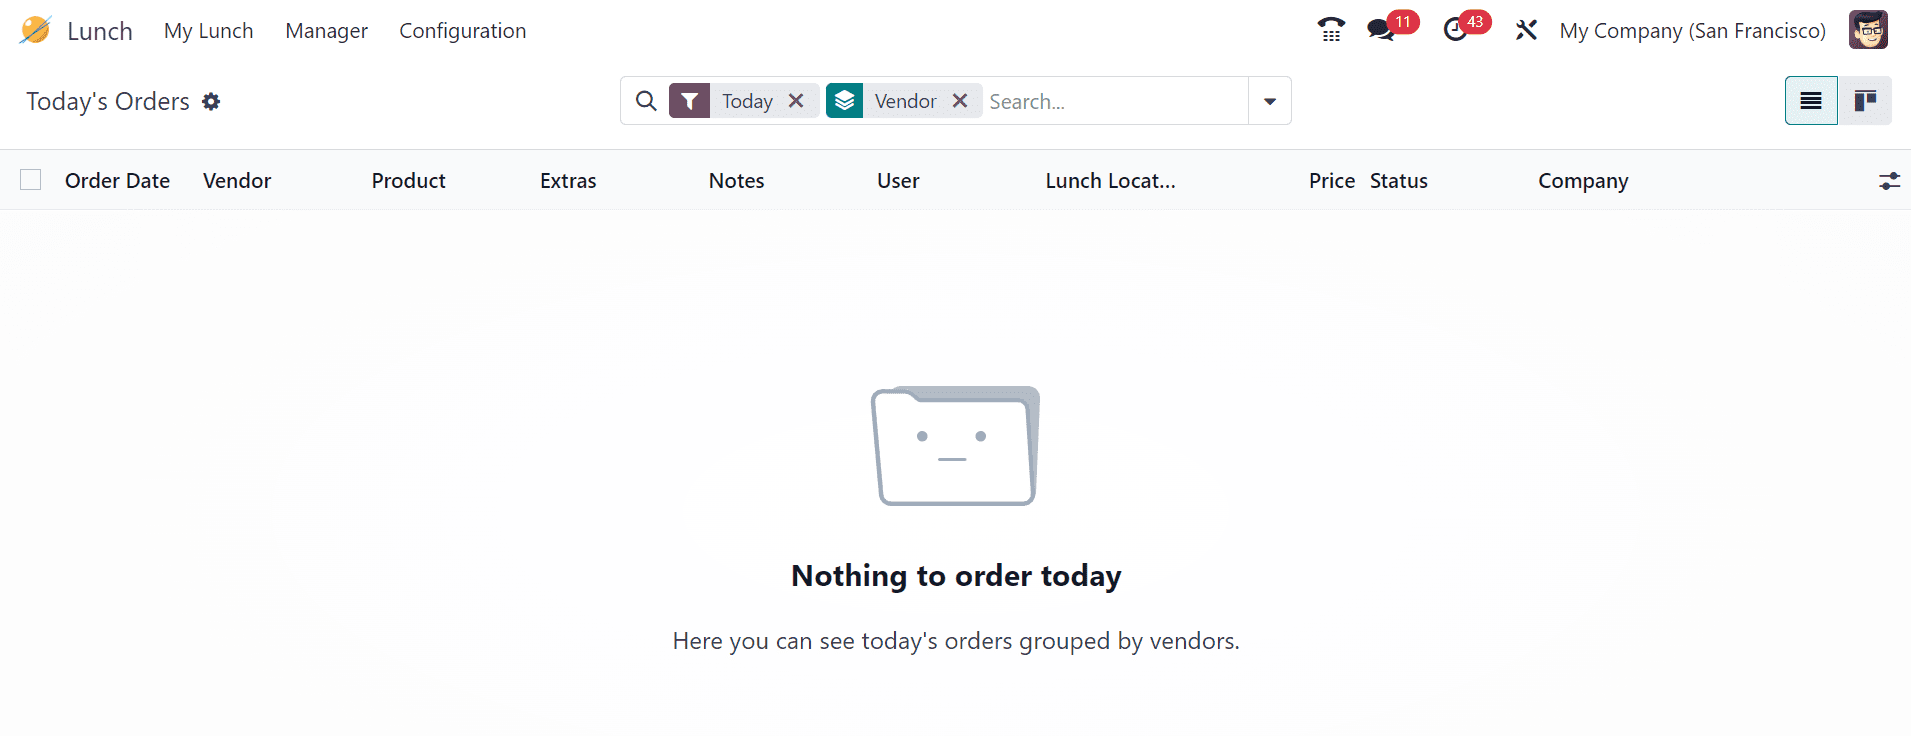
Today’s Order
The Today’s Order option offers an overview of all food orders placed for the current day. Managers can view detailed information about each order, including:
- Order Date: The date the order was placed.
- Vendor: The supplier providing the food.
- Product: The item ordered.
- Extras: Any additional items or modifications.
- Notes: Special remarks related to the order.
- Price: The total cost of the meal.
This submenu enables managers to efficiently monitor and manage all daily orders, ensuring smooth lunch operations.
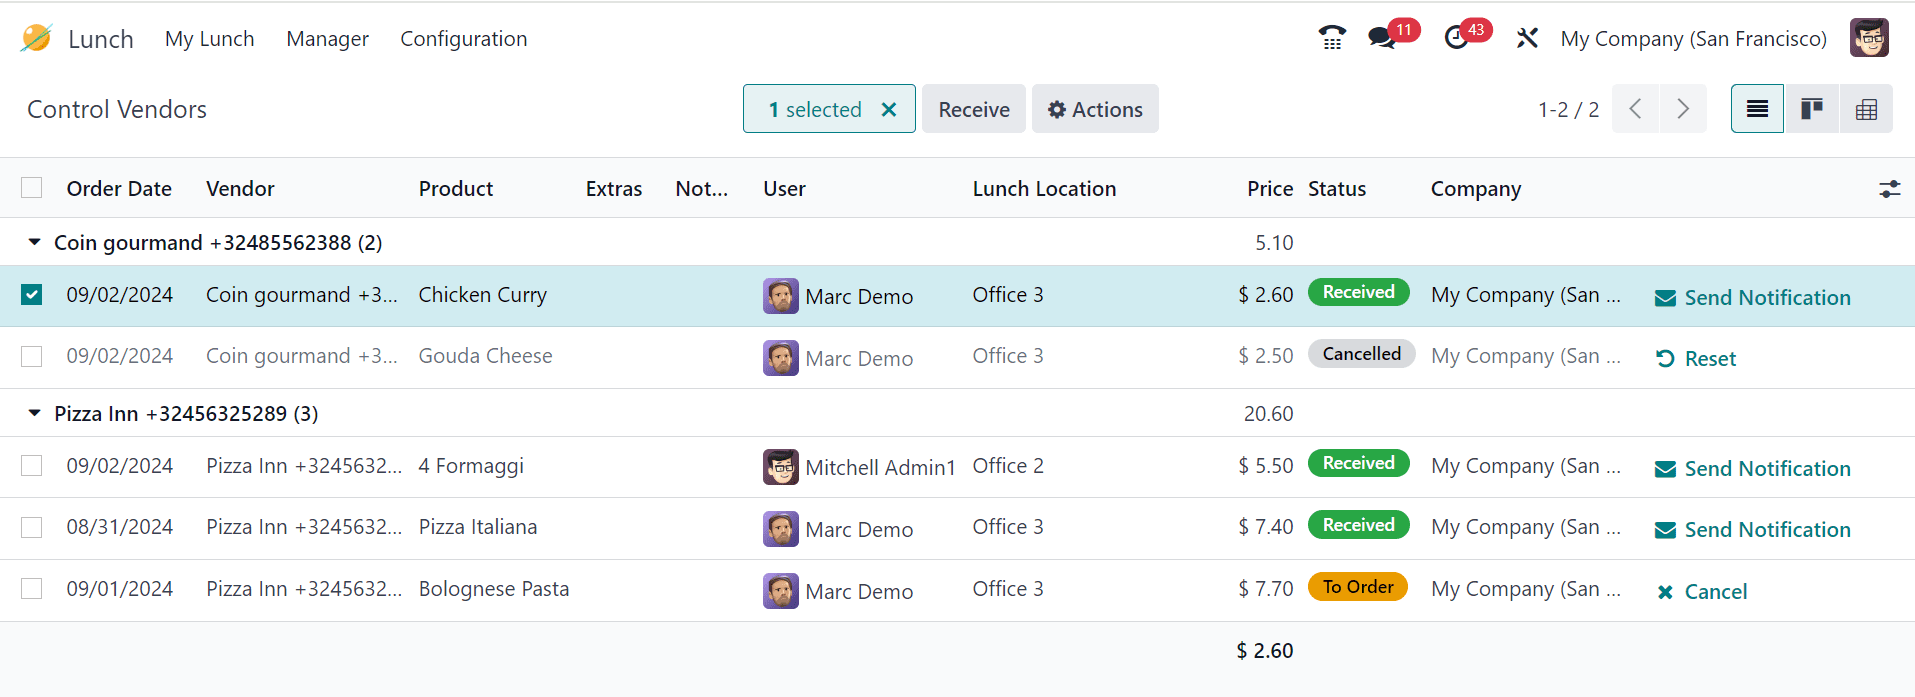
Control Vendors Menu
By using the Manages tab’s Control Vendors option, you may see the specifics of orders made with various suppliers. It is possible to examine each vendor’s orders independently.
Configuring Vendor Details
To set up or update vendor details in the Odoo 17 Lunch module, follow these steps:
- Navigate to the Configuration menu and select the Vendors option.
- Choose an existing vendor from the drop-down menu or create a new vendor.
- If adding a new vendor, fill out the vendor configuration form with the required details, such as vendor name, contact information, and any relevant attributes.
This allows seamless management of vendor details, ensuring accurate tracking and streamlined operations.
Control Accounts
The Control Accounts option, available in the Managers menu, provides a comprehensive view of lunch orders and account balances across various user accounts.
Key Features of the Control Accounts Dashboard:
- Detailed Account Balances: Displays current balances for employee accounts.
- Financial Activity Tracking: Monitors all transactions related to lunch orders.
- Order Summaries: Provides a breakdown of orders placed by individual users.
This dashboard ensures proper accounting, helps maintain accurate records, and offers clear financial visibility for both employees and managers. It’s an essential tool for tracking lunch-related financial activity and maintaining accountability within the organization.

Cash Moves
The Cash Moves feature in the Odoo 17 Lunch module enables managers to efficiently track and manage all cash transactions related to lunch operations.
Key Features:
- Detailed Transaction View: Displays essential details for each transaction, including:
- Date: When the transaction occurred.
- User: The employee associated with the transaction.
- Description: Notes or details about the transaction.
- Amount: The monetary value of the transaction.
This functionality provides a transparent overview of cash flow, ensuring accountability and facilitating effective financial management within the lunch module.

Managers can manually input and record cash transactions as needed by clicking the New button.

User Name, Date, Amount and Description can be edited to configure new Cash Moves details.
Configuration Menu
The Configurations menu consists of Settings, Vendors, Locations, Products, Product Categories, and Alerts options.
Settings
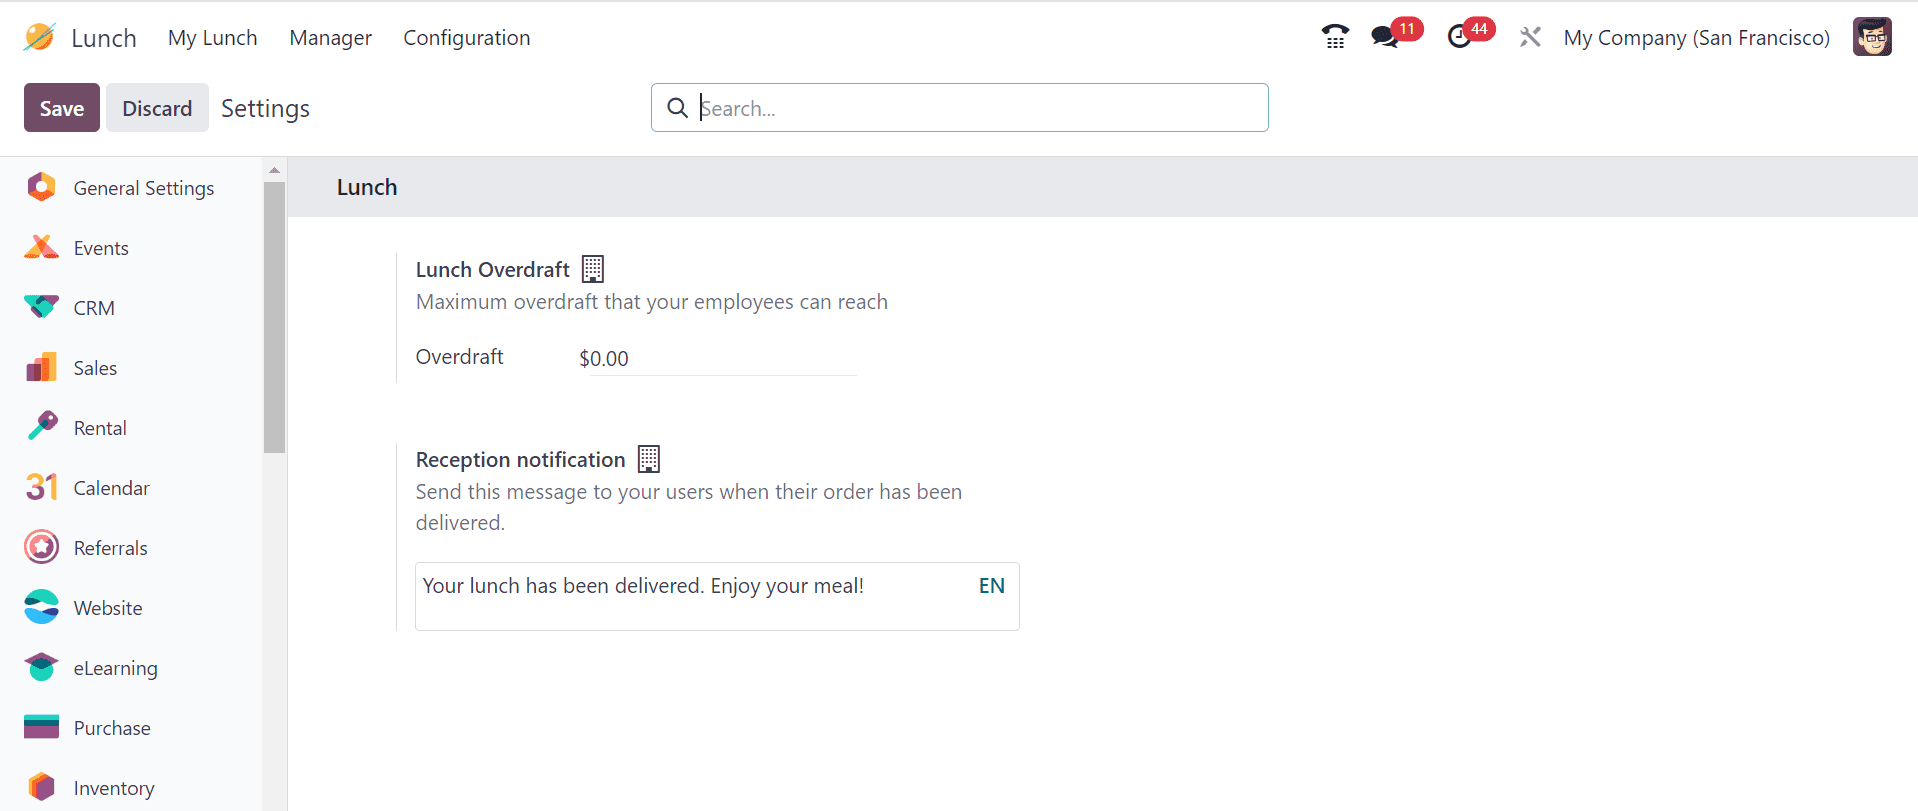
The Settings menu in the Odoo 17 Lunch module provides administrators with options to customize and manage lunch operations effectively. Key configurations include:
- Maximum Lunch Overdraft Limit: This option allows administrators to set a predefined spending limit for employees, ensuring they do not exceed their allocated lunch budget.
- Reception Notification: This feature sends an automatic alert to employees when their lunch orders are delivered, enhancing communication and improving the overall lunch service experience.
These settings help maintain control over lunch expenses and ensure that employees are promptly informed when their orders are ready, contributing to a smoother and more efficient lunch service.
Vendors
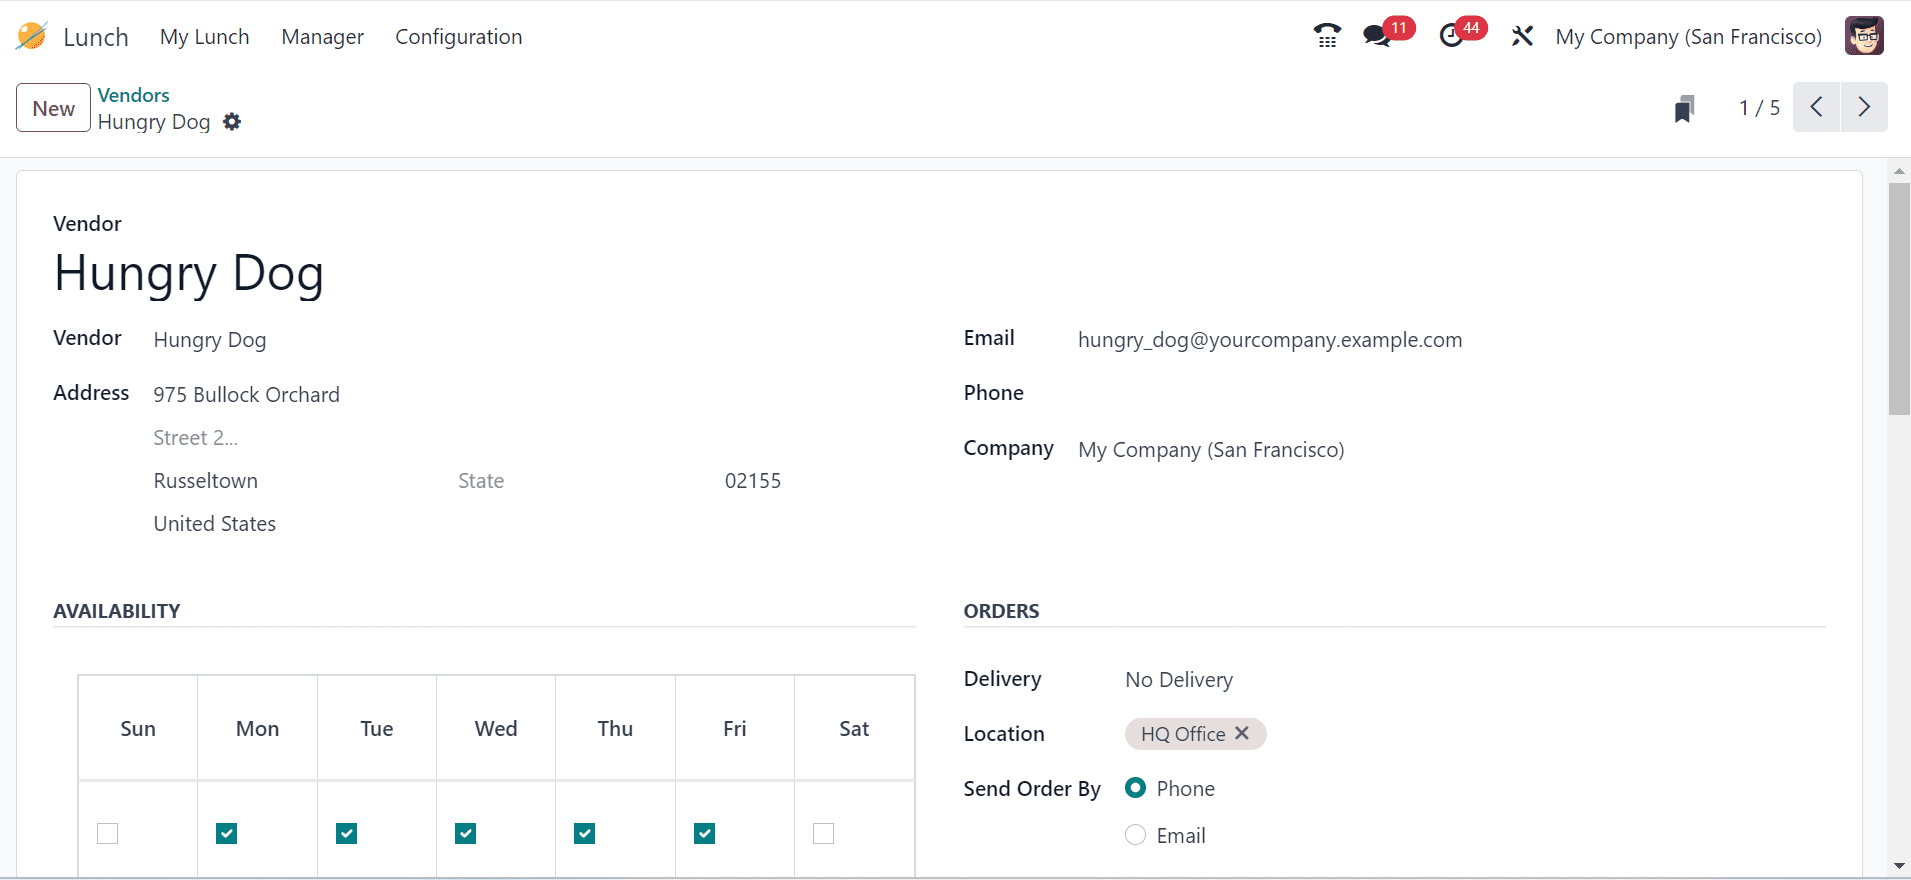
The Vendors tab in the Configuration menu displays a comprehensive list of vendors associated with the lunch module. Each vendor is represented in a separate Kanban card, making it easy to view and manage their details.
Vendor Information includes:
- Name: The vendor’s business or contact name.
- Location: The physical location or address of the vendor.
- Contact: The primary contact person for the vendor.
- Address: The full address of the vendor.
- Email Address: The email contact for communication with the vendor.

Users can select a vendor to view more information or make changes. To add more vendors, click the New button.
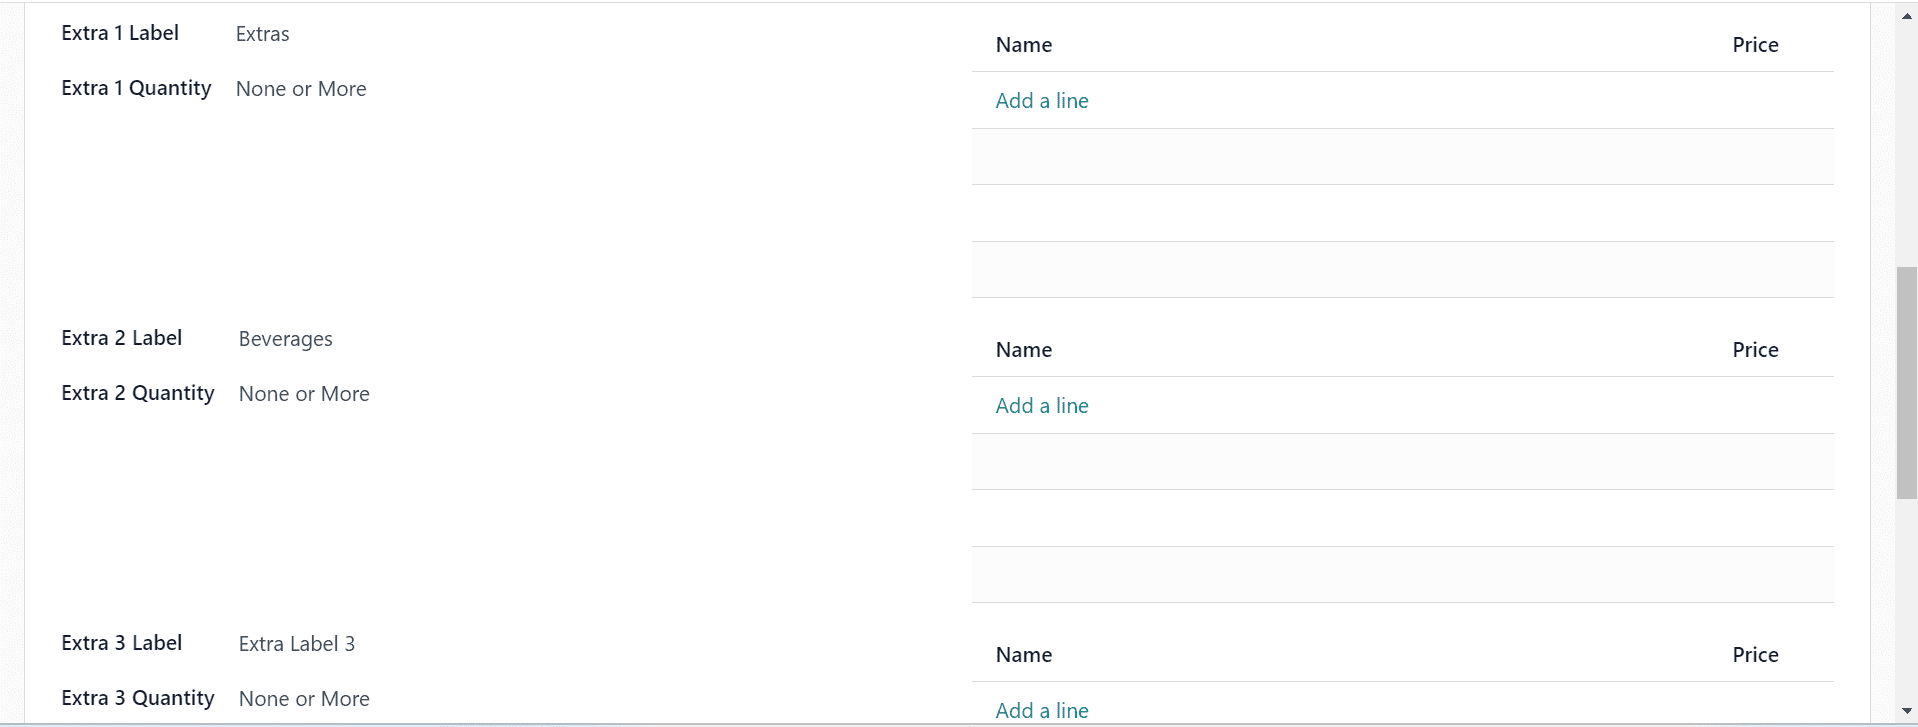
The form view for Odoo 17 lunch allows users to enter vendor information, including Address, Email, Phone, Company, and Responsible. It also allows for AVAILABILITY, and ORDERS. Additional labels can be added using the relevant fields as shown below.
Location
In Odoo, the Location feature allows administrators to set up specific areas where employees will receive their meal orders. This can be easily configured through the Configuration menu by selecting the Location option.
Location Details include:
- Location Name: The name or identifier of the meal delivery location.
- Address: The physical address of the location where meals are delivered.
- Company: The company associated with the location, if applicable.
You can update the location’s name or address by simply selecting the desired entry and making the necessary changes. This helps streamline meal deliveries, ensuring that each employee’s order is correctly routed to the designated location.

A new row will show up when you pick the New button. As shown below, enter the relevant information and click on the “Save” button to save the new location.

Products
In Odoo, the Products option under the Configuration menu allows you to view and manage the food items available in the lunch management system. This serves as a product catalog where you can store and organize meal options for employees.
Product Details include:
- Categories: The classification of food items (e.g., breakfast, lunch, snacks).
- Vendors: The suppliers or vendors providing the food products.
- Company: The company associated with the product, if applicable.
- Descriptions: Detailed descriptions of the food items, including ingredients or preparation methods.
This window provides a comprehensive overview of all available products and helps maintain an organized catalog of meal options for efficient lunch management.
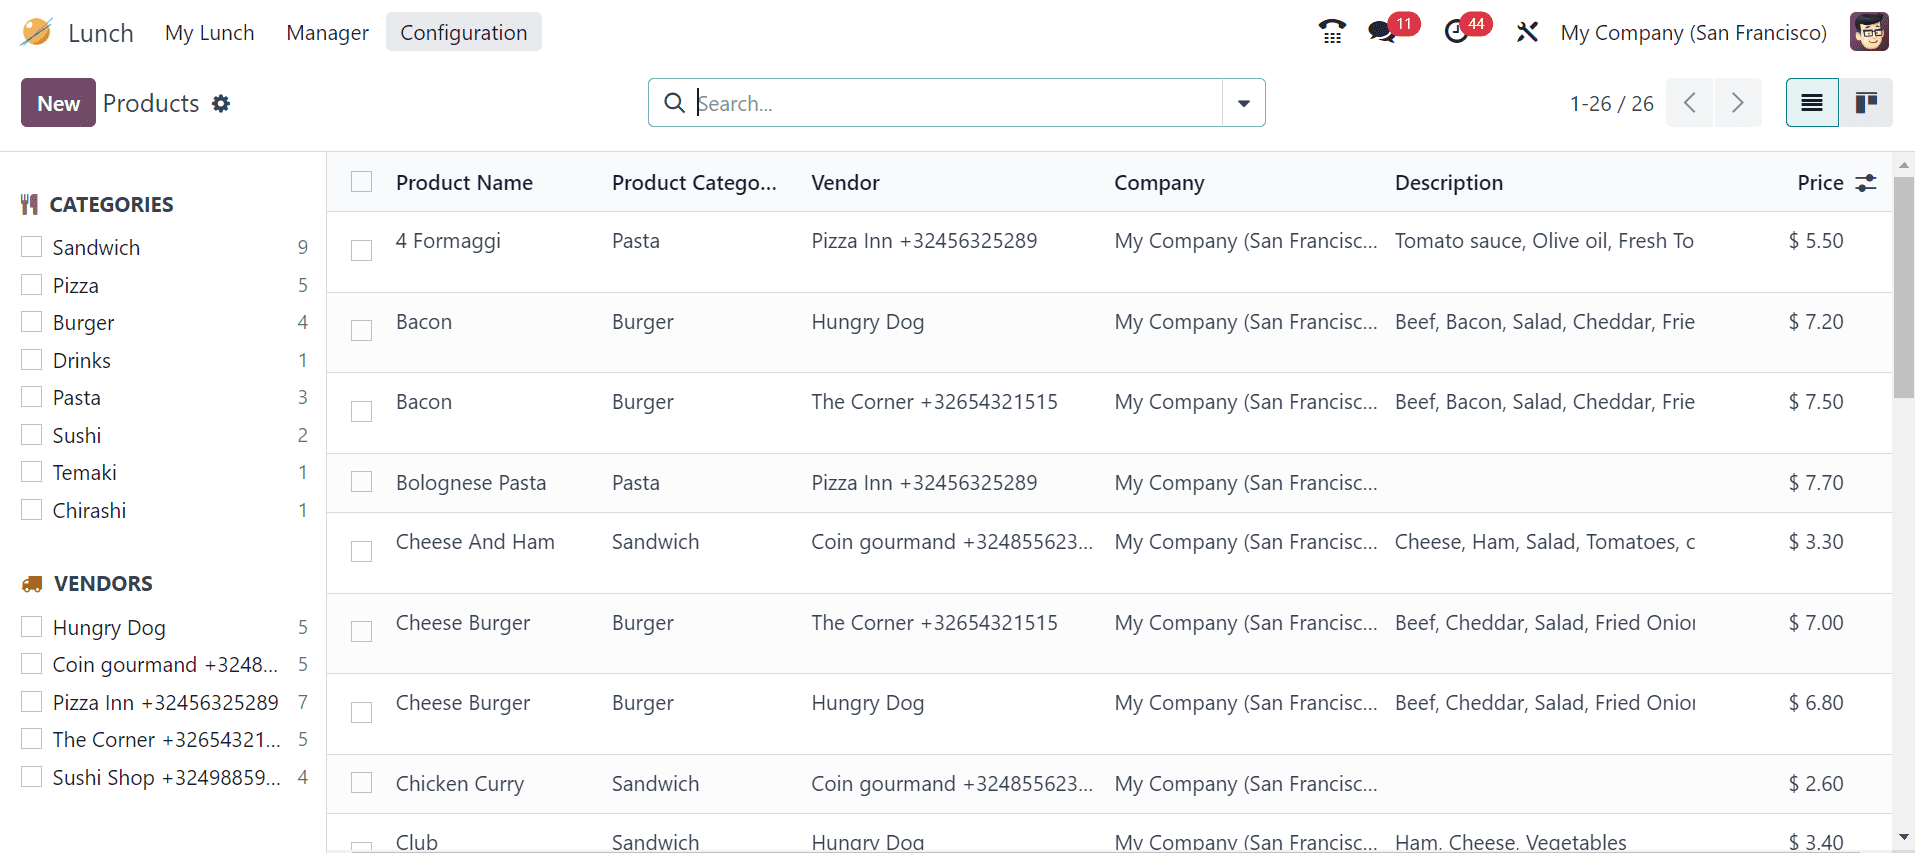
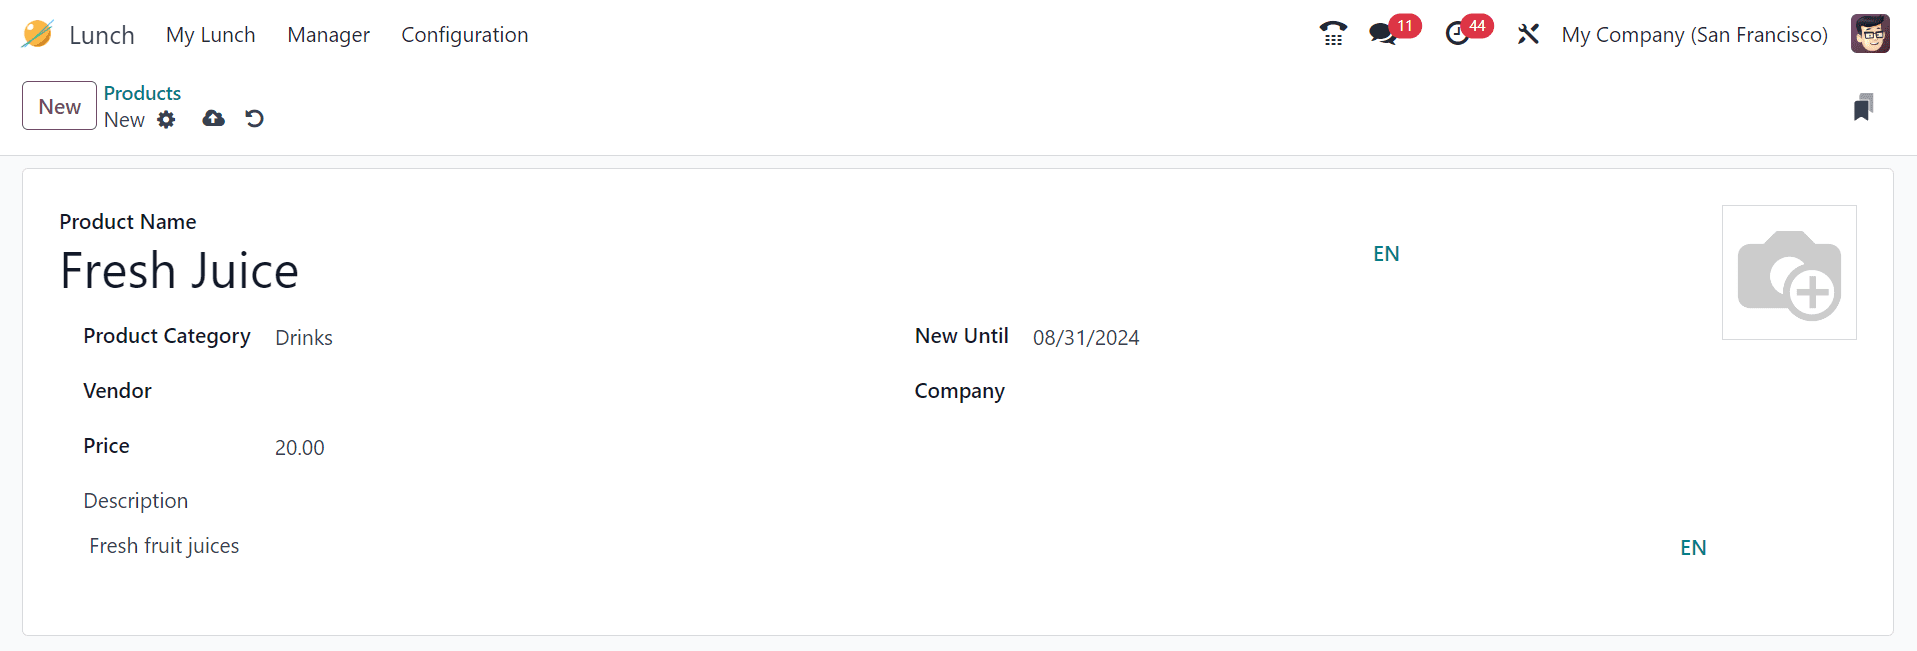
To add a new product, click the New button and enter product details like Product Name, Category, Vendor, Price, validity at New Until, and Company name as depicted below.
Product Category
Product categories are a useful feature for easier ordering. Click the Product Categories option to examine and configure multiple product categories. The list displays the categories and the company name.
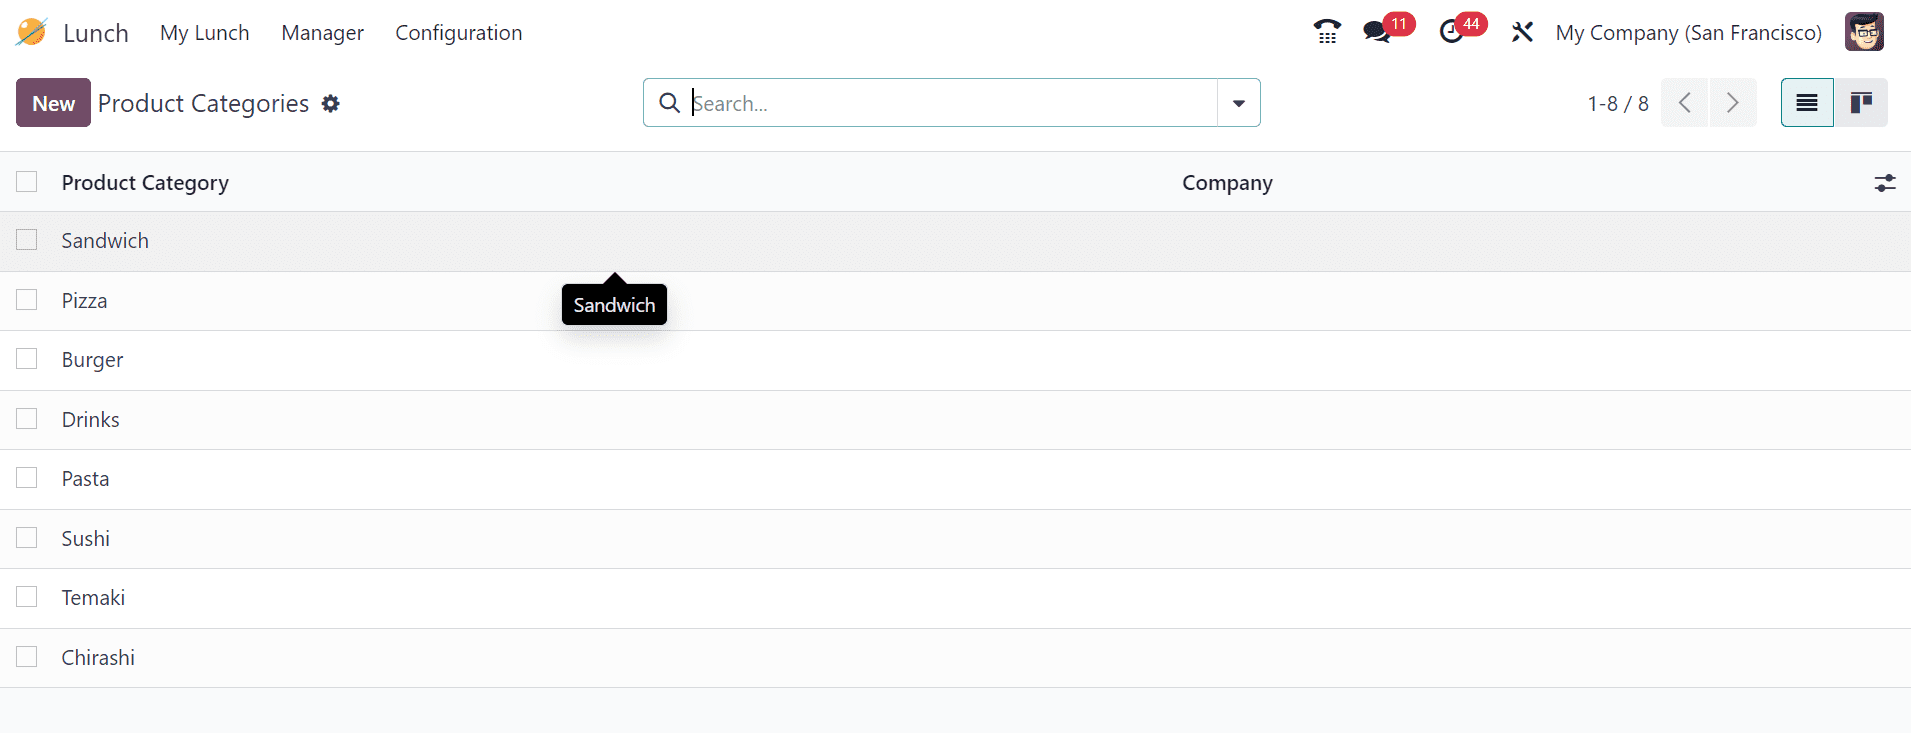
To add a new category simply click on the New button. Then, enter the Product Category name, select the Company, and save the category. The category will be displayed in the list.

Alerts
The Alerts feature in the Odoo Lunch module allows administrators to set up reminders or notifications for employees regarding their lunch orders. To configure alerts, select the Alerts option from the Configuration menu.
Alert Details include:
- Alert Name: The name or title of the alert.
- Display Message: The message that will be shown to employees when the alert is triggered.
- Active Status: Indicates whether the alert is currently active or inactive.
This configuration helps ensure that employees receive timely reminders about their lunch orders, improving communication and the overall lunch experience.

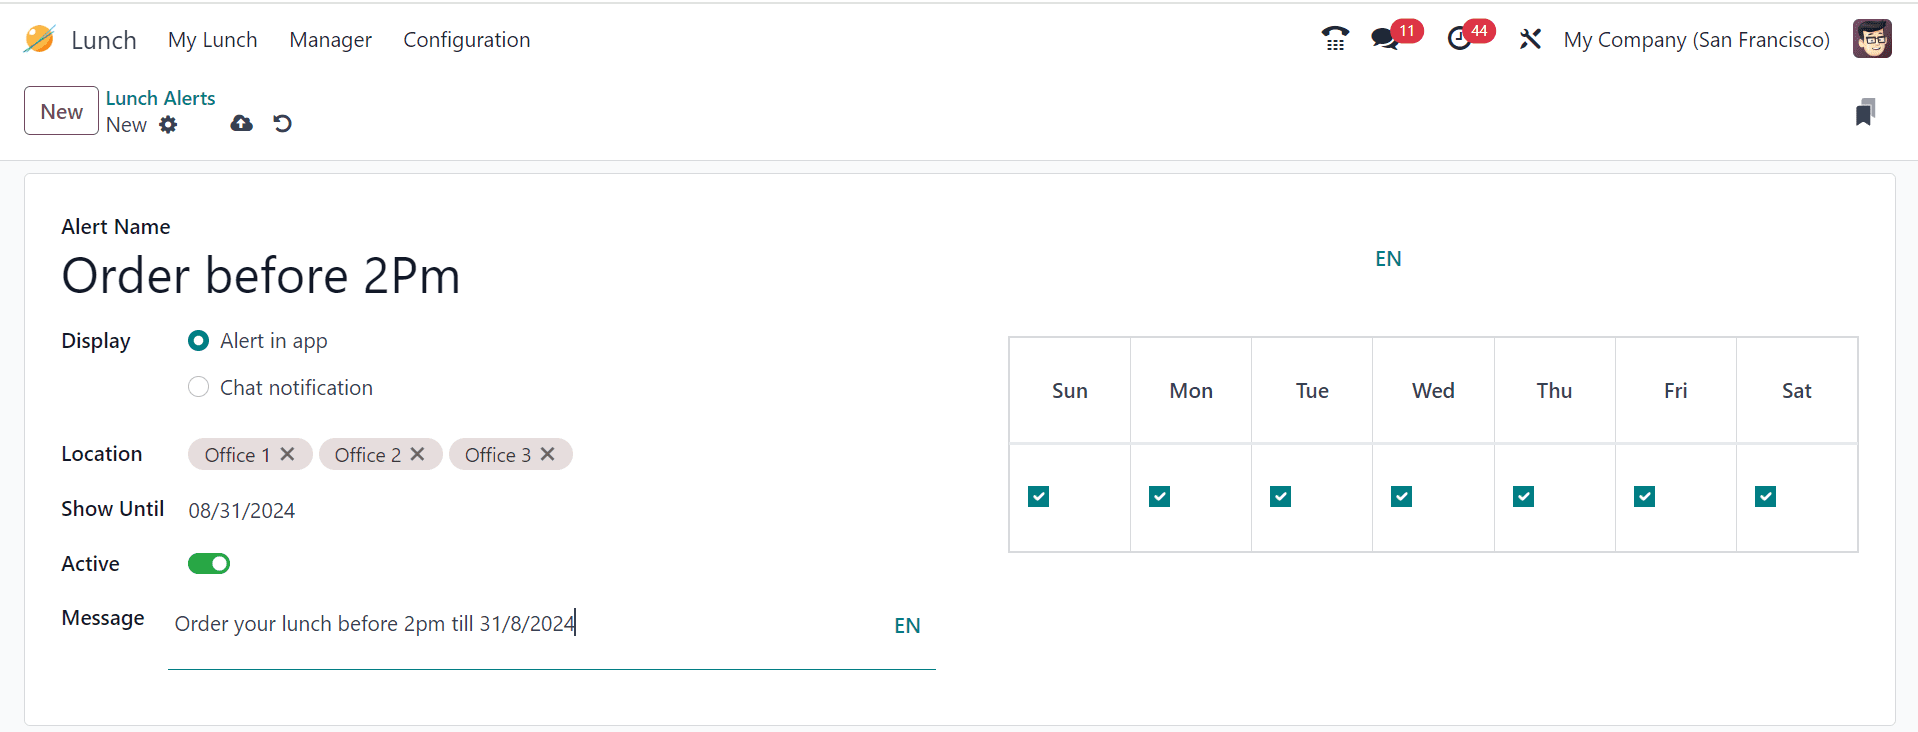
Creating New Alerts
To create new alerts in the Odoo Lunch module, follow these steps:
- Click the New button: This opens the form to create a new alert.
- Enter the following details:
- Alert Name: Provide a name for the alert.
- Display Type: Choose how the alert will be displayed (e.g., popup, notification).
- Location: Select the location where the alert applies.
- Show Until Date: Set the date until which the alert will be active.
- Active Status: Enable or disable the alert based on its status.
- Regulated Message: Define the message that will appear in the alert.
- Days to Follow: Specify the days on which the alert will be triggered.
- Save the Settings: Once all fields are configured, save the settings to activate the alert.
This process ensures that the correct reminders or notifications are displayed to employees at the right time, enhancing the lunch ordering experience.
By leveraging Odoo 17’s comprehensive features, you can streamline and automate your employee lunch management process, making it more efficient and user-friendly. Odoo 17 provides all the necessary tools to manage lunch orders, schedule breaks, track employee preferences, and analyze expenses effectively. This allows businesses to optimize their lunch operations while improving employee satisfaction and reducing administrative workload.
Follow me on LinkedIn for more latest updates
